A Comprehensive Guide on How to Crop Images in GIMP: Mastering the Art of Precision Editing
In the realm of digital image editing, GIMP (GNU Image Manipulation Program) stands out as a powerful and versatile open-source software. One fundamental skill every graphic designer or photographer should master is cropping images effectively. Whether you're a beginner exploring GIMP for the first time or a seasoned user looking to enhance your skills, this guide will walk you through the intricacies of image cropping in GIMP.
You can simply crop your image without any programs at CropMe.net tool.
Understanding the Basics of Cropping:
Cropping is a fundamental editing technique that involves removing unwanted parts of an image to improve composition or focus on a specific subject. In GIMP, this process is both intuitive and feature-rich, offering users the flexibility to achieve precise and professional results.
Step 1: Opening Your Image in GIMP
Before diving into the cropping process, ensure you have GIMP installed on your computer. Once installed, launch the software and open the image you wish to crop. You can do this by navigating to "File" and selecting "Open" or by using the shortcut Ctrl+O.
Step 2: Selecting the Crop Tool
GIMP offers a dedicated Crop Tool that simplifies the cropping process. Locate the Crop Tool in the toolbox on the left side of the screen. It typically looks like a square divided by diagonal lines. Alternatively, you can activate the Crop Tool by pressing the letter "C" on your keyboard.
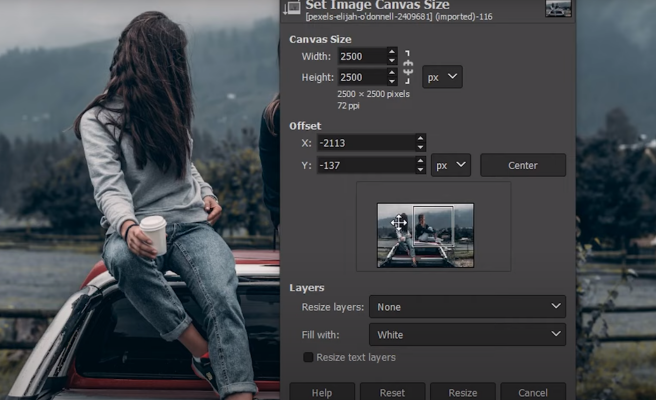
Step 3: Adjusting the Crop Area
Once the Crop Tool is selected, click and drag to create a cropping rectangle over your image. This rectangle represents the portion of the image you intend to keep. Adjust the size and position of the rectangle until it encompasses the desired area.
Precision Tip: To maintain a specific aspect ratio while adjusting the crop area, hold down the Shift key while dragging.
Step 4: Fine-Tuning with Crop Options
GIMP provides additional options for fine-tuning your crop. Look for the Crop Options panel in the tool options dock. Here, you can set specific dimensions, resolutions, or even choose predefined aspect ratios. These options ensure a high level of precision in your cropping process.
Step 5: Committing to the Crop
Once satisfied with your crop area and settings, press the Enter key or click the "Crop" button in the tool options dock. GIMP will then remove the unwanted portions of the image, leaving you with the cropped version.
Advanced Techniques for Precision Cropping:
While the basic crop tool is sufficient for most tasks, GIMP offers advanced techniques to elevate your cropping skills.
- Rule of Thirds Overlay: Enable the Rule of Thirds overlay to guide your cropping decisions. This overlay divides the image into thirds both horizontally and vertically, helping you position the important elements of your composition.
- Golden Ratio Cropping: For a more aesthetically pleasing composition, consider using the Golden Ratio. GIMP allows you to overlay the Golden Ratio grid on your image, aiding in the precise placement of focal points within the frame.
- Non-Destructive Cropping with Layers: Instead of permanently altering your original image, utilize layers for non-destructive cropping. Duplicate the layer, crop the duplicate, and mask or erase the unwanted areas. This way, you can always go back to the original if needed.
- Content-Aware Cropping: GIMP's Resynthesizer plugin provides a content-aware filling feature, allowing you to seamlessly fill in the cropped areas with surrounding image content. This is particularly useful when cropping objects and wanting to maintain a natural look.